Even though Minecraft Java doesn’t support controllers by default, there is still ways to connect a controller to Minecraft.
The Bedrock Edition does have some support but if you are looking into how to play Minecraft with controller on pc then we are here to help you!
Regarldess if you want to use a Xbox controller, PS4, PS5, or any other that you like, there is a way to set it up.
The basic steps on setting up a controller to play Minecraft Java on PC are:
- Connect your controller to your PC
- Enter big-picture mode in Steam
- Create a controller configuration shortcut via Minecraft
- Map your preferred buttons.
- Launch Minecraft and play!
If that sounds kind of complicated, don’t worry because all of that is about to be broken down into easy-to-follow instructions.
If you’re ready to learn how to connect a controller to Minecraft pc, get ready to be creative!
Connecting a Controller to Minecraft PC Step-by-Step
1. Connect Controller
To play Minecraft on your PC, you can use almost any controller whether it’s Xbox 360, Xbox One, Playstation 3 or 4, or even a Nintendo Switch Pro. Most people use a wireless controller via bluetooth, but you have the option to plug a wired one into a USB port.
If you don’t have a controller for PC check out our reviews for the best controller for Minecraft in PC.
2. Time to Steam
The first thing you’ll want to do is install the Steam application on your computer and open it, because Steam is how you’ll be able to map your controller layout. Once it’s open, find the “Library” tab at the top.
At the bottom left of the screen you should see “add a game.” Clicking that will bring up a menu, so select “add a non-steam game.” For most people, Minecraft will be in the list of applications that pops up but if it doesn’t don’t worry.
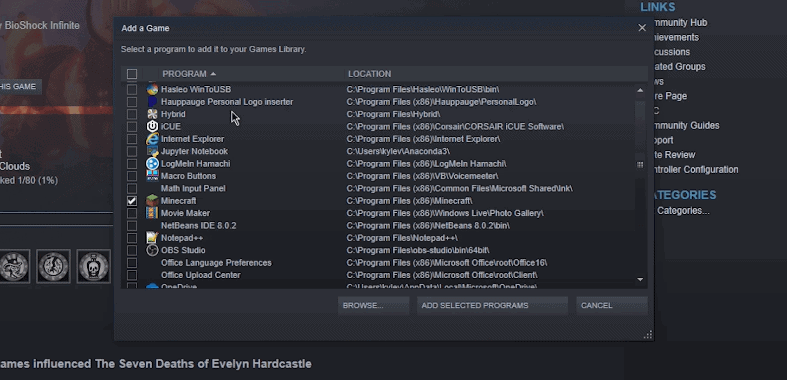
Just hit “browse” and navigate to “program files,” where you’ll want to select “minecraftlauncher.exe.” Once selected, hit “add selected program” and the pop-up window will go away.
3. Think Big-Picture
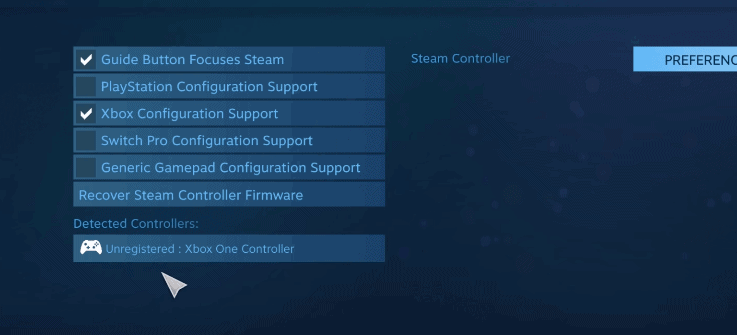
Now you can click on “big picture mode” in the upper-right corner of the app. This will load a sort of user-interface version of Steam, where you should click “settings” followed by “controller settings.”
This is where you’ll see how many controllers you can use, so select which controller you’re using. For an Xbox one click “Xbox” or Playstation click “Playstation,” etc. There’s an option for generic controllers as well.
If you’re not sure which controller type you’re using, the bottom half should have a tab for “detected controllers.” There you’ll see what you’re using, so make your choice and go back to the main screen where you can then click on the “library” tab.
4. Mapping Your Controller
In the “library” menu, you’ll need to find the left-hand tab that says “browse” and click “games.” Scroll through until you find Minecraft, which was added earlier. This will bring up a small window where you’ll click “manage shortcut” followed by “controller configuration.”
Before going through the next process, keep in mind that it’s based on personal preference. Some people prefer to play with a southpaw variant or one better for certain actions in-game.
If you don’t want to take the time to map the layout yourself, you can click on “browse configurations” at the bottom of the screen. From there, go with the “community” tab on the left and you’ll open a list of pre-made configurations by other Minecraft players on Steam.
5. Do Your Own Controller Mapping
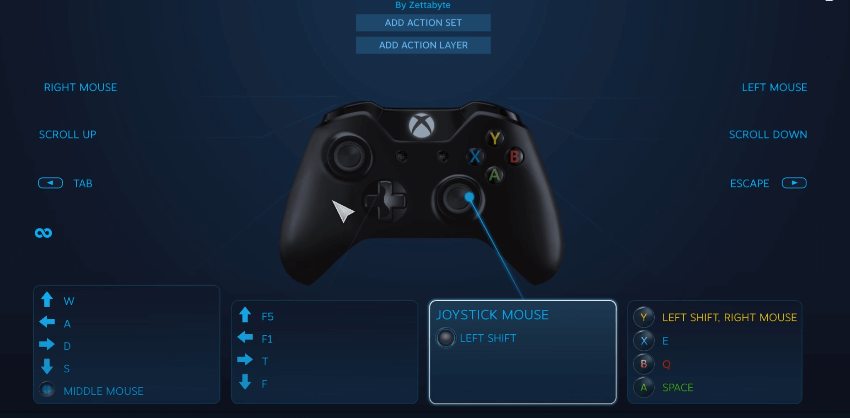
Assuming you want to create your own controller configuration, here’s a generic layout that’s the closest to what most gamers are used to when mapping:
> Click on the left joystick and choose “directional pad” under “style of input.” For the “layout,” go with “8-way overlap.” In the directional picture, select W, A, S, and D for the up, down, left, and right respectively.
> There’s an optional shortcut for the middle mouse button if you select it for “click action.” This will let you aim at a block and select it when you click. Otherwise, go back to the controller layout menu and select the directional pad.
> Once again, for the “style of input” go with “directional pad” and “8-way overlap” under “layout.” For this d-pad picture, though, you’ll want F5 for “up,” F1 for “left,” T for “right,” and F for “down.” This will let you enter third-person, turn off the HUD, open the chat box, and move any item to your left hand respectively.
> Go back to the controller layout and select the right joystick. For the “style of input,” select “joystick mouse.” You’ll probably want to turn down the sensitivity, but select “left shift” under “click action.” Unless you want to hold the button to crouch, set “toggle” to “on.” Under additional settings, you might also want to turn down the “inner dead zone.”
> Back at the controller picture, click on the button pad where you’ll select “button pad” for the “style of input.” For X, A, B, set them as “E,” “A,” “Q,” respectively. This will let you open your inventory with “E,” jump with “A,” and drop items with “Q.”
> As for the Y button, you might want to click on “toggle multi-button” at the bottom of the screen. Set is as “shift” and “right-click” combined, because this will let you move an entire stack of items between your inventory and chests.
> For each of the following, you’ll have to go back to the configuration after each one: Set the back button as “tab” to see all players on a server in multiplayer. The start button can be mapped to “escape” to open the menu.
> The left and right bumpers can be set to “scroll up” and “scroll down” respectively. This will let you scroll through the hotkey bar in-game.
> As for the triggers, set the right as “left mouse” under “soft pull action” and the left as “right mouse.” The opposites will let you break blocks with the right trigger and set blocks with the left trigger.
6. Launch Minecraft
Once you’re done configuring your controller, click “export config” at the bottom followed by “save new personal binding.” Click “save” and it will always be available to edit back at the “personal” tab under “controller configuration shortcut.”
Otherwise, press “done” and go back until you find Minecraft again.
Hit play to launch the game, though it should be noted that you always have to launch it through “big picture mode” in order to use your controller layout.
At the main menu with the given layout above, use the right joystick to move the mouse and the right trigger to click.
If for some reason your controller doesn’t work in-game, hit F11 to enter windowed mode and hit F11 again to return to normal.
This acts as a sort of reset because the game-controller connectivity can sometimes be buggy in full-screen mode. If everything is mapped correctly, once you select your world, it should play just like you’re on a console so good luck surviving the first night!
Conclusion
In case the instructions were not clear enough make sure to watch the video below and follow their steps, is not too complicated.
Playing Minecraft with mouse and keyboard is great, easy and comfortable. There are amazing keyboards for Minecraft and great mouse for Minecraft PC to upgrade your set up but if you are a regular console gamer vs pc then setting up a controller might be the best for you.
We hope this was helpful. Enjoy playing Minecraft PC with your new controller.